2V 308 GTBi/GTSi
15K Service
AUTHOR:
William Burfeind
OVERVIEW:
The 15K service for 2V 308’s involves changing sparkplugs, changing fuel filters, changing the air filter, and checking / rectifying valve clearances. This assumes that oil and transaxle fluid changes are up to date as well as your yearly coolant flush. If not, these should also be added to the service. This service should also apply to 4V 308’s.
SPECIAL TOOLS:
The only tools, outside of a good set of sockets / wrenches / screwdrivers, are a 6 mm hex-head socket, a 36 mm socket, a feeler gauge, a micrometer, and a valve shim removal tool. The shim removal tool that I used can be purchased from T. Rutlands (770-493-8852) for $45.
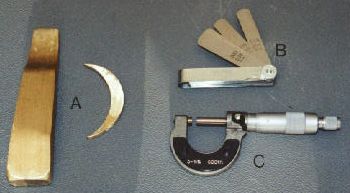
(A: valve shim removal tool, B: feeler gauge, C: micrometer)
PARTS:
All parts were purchased from T. Rutlands in 1998.
| 2V 15K Gasket kit | $27.20 |
| Fuel filters X 2 | $44.10 total |
| Air filter | $16.75 |
| NGK BP7ES plugs X 8 | $47.60 total |
| Shims | $3 apiece |
CAR PREP:
Start with the gas tank near empty. I removed the rear bonnet for easier access to the front cylinder bank. Remove air intake hose from throttle body and air-flow sensor device. Remove engine reaction rod (between rear cam cover and firewall). Disconnect throttle linkage and pull through front cam cover. Disconnect the battery cables. Loosen the bolts that hold the fuel distributor down. Remove sparkplug wires from plugs. Back off on sparkplugs 1 or 2 turns (not all the way or plugs could theoretically shoot out when the engine is manually cranked and pressure inside the cylinder builds) so that air can pass by the threads for easy manual engine cranking. The engine can be manually cranked with a 36 mm socket placed in the end of the crank dampener and rotating it clockwise. Unplug wires from distributor caps to coils. Remove distributor caps and rotors (rotor has a 3 mm allen wrench bolt holding it on the cam end). Clean and dress distributor caps and wires and store safely. Disconnect vapor recirculator hose from left side of rear cam cover. Remove air-filter cover and gently pull bottom piece off airflow sensor housing (there is a hose connected to the bottom of the air-filter housing that needs to be removed). Block front right tire. Place left rear up on jack stand. Remove wheel and inner fender. Remove the vapor/oil separator.
FUEL FILTER CHANGE:
Place newspapers (many) on the ground under the fuel filters. Open all doors and windows to garage to help dissipate gas fumes. Make sure battery is disconnected. There will be a small amount of gas spillage so don’t blow yourself up by smoking. I accessed the filters by placing my body between the left rear gas tank and the brake rotor.
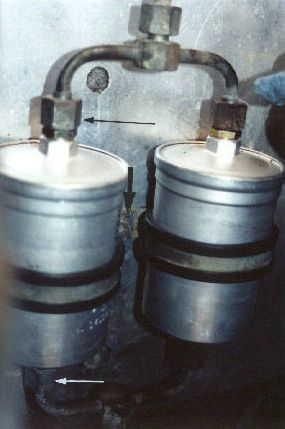
Remove the 10 mm nut holding the filter retainers to the fire-wall but don’t pull the retainers off the stud (large arrow). This will help steady the filters while loosening the fuel filter connections. The major danger at this point is in bending the "Y" joint above the fuel filters. Using two 19 mm wrenches carefully loosen the top and then bottom of the fuel filter connections (small arrows). Then, by hand, unscrew the nuts on top of the filters and separate the "Y" joint from the filters. Pull the filter retainers off the stud and unscrew the filter off the bottom nut. In an expeditious fashion, screw the new filters on to the bottom nuts, hand tighten, and replace filter retainers on to the stud. Using wrenches, tighten lower connections. Replace upper connections to filters and tighten with wrenches. Replace nut that holds filter retainers to the fire-wall. Remove newspapers from garage and do not reconnect battery until all fumes have dissipated.
CHECKING VALVE CLEARANCES:
With left rear still up in the air, remove the distributor bases (6 mm hex head socket) and cam-end cover on the left of the front exhaust bank cam. The air-pump pulley can be left alone. If the distributor housings are stubborn then a medium tap (whack) with a rubber mallet may break the gasket seal. When distributor housings are off, replace the left rear wheel and put the car on the ground. Remove the rear bank cam cover. To help break the seal you can put a socket extension bar through the holes for the engine reaction rod and pull. Remove the cam cover by sliding it between the studs and the fuel distributor (which moves slightly now that its mounting bolts are loose). It is a tight fit, nonetheless.
Remove the front bank cam cover. The seal can be broken by placing a piece of wood between the cam end and the cam cover and very gently prying it up. Never force anything sharp or metallic between the cam cover and head or it will scar the aluminum and will leak forever (unless resurfaced). Clean the cam covers and store safely. Next measure valve clearances.
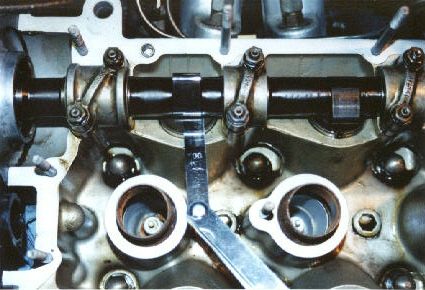
This is done by placing a feeler gauge between the shim and the cam with the cam lobe pointing away from the shim. This process is somewhat subjective as many different feeler sizes will fit in between the cam and shim. Start with a size you know will be too small and work your way up. The proper size is the one that slides easily but you can feel the friction. Write down all values. Ferrari’s tolerances for valve clearances are 0.2 - 0.25 mm for intake valves and 0.3 - 0.35 mm for exhaust valves. Over time, due to the valve slamming into the valve seat, the tolerances generally get tighter. With the cam lobe pointed away from the shim, insert the shim removal tool and compress the valve spring just enough to slide the spring retaining piece (comes with the tool) in between the bucket edge and the camshaft. Do not over compress the spring or the valve seal can be damaged.
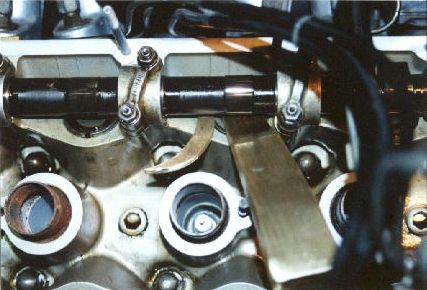
Remove the shim. The shim will be held in the bucket by oil surface tension. Techniques for removing the shim include blowing compressed air in between the shim and bucket to dislodge it or using a "jeweler’s" screwdriver to gently pry it up. The are slots in the bucket (and the buckets rotate freely in their holes) where you can place the small screwdriver. A dental pick would also work well here.
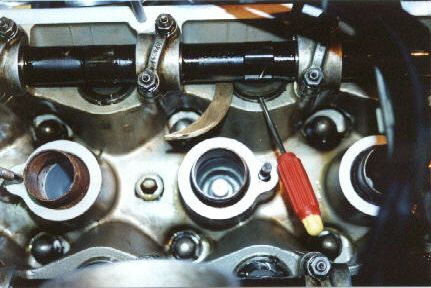
With the shim out, measure its thickness with a micrometer and record this value. I replaced the shim after I measured it so that I wouldn’t misplace or mix them up. Repeat this process for each valve. Do the math to figure out what size shim is needed to make the clearance fall into spec. for each valve. Order the correct shim size from a Ferrari part source. They come in 0.05 mm increments. There is some controversy regarding whether a shim can be reused in another position if it happens to be the right size. I have had several Ferrari mechanics tell me that this is perfectly acceptable and they do it all the time. On the other hand, a very knowledgeable Ferrari List member says that this is not acceptable and new shims should always be used. With the new shims in-hand, replace the old shims and measure the clearances again to confirm that they are in spec. Use a small amount of silicone gasket sealer to attach the new gasket to the cam cover and use a very very small amount of lithium grease on the head mating surface (so that the next time the cam covers are removed, the gasket doesn’t stick to the head). Replace the cam covers (I used new spring washers and acorn nuts, $20, don’t use a lock washer or it will scar the aluminum). Do not harm the cam cover gaskets while attempting to replace the cam covers. Of course, use a criss-cross pattern to evenly torque down acorn nuts. Do not over-tighten as the gasket can be fractured or the cam cover can be bent (6-7 foot-lbs). Replace the gaskets on the distributor bases and the cam-end plate and reinstall these (again, evenly torquing these down in a criss-cross pattern). Replace the vapor collector on the rear cam cover. Refasten the fuel distributor down to its mounts. Blow compressed air into the sparkplug holes to clear particulate matter from the well. Gap new sparkplugs. Remove old plugs. Place a small amount of anti-seize on the new plug threads and reinstall the new plugs. Start the plugs by hand (I hold onto a socket extension, sans the ratchet, and start the plug) and then torque them down until the aluminum gaskets crush. Replace the distributor rotor and then the distributor cap (make sure the little peg lines up with the cap). Connect the spark plug wires and the connection to the coil. Replace the oil vapor separator. Carefully place the bottom of the air-filter box onto the air-flow sensor housing after reconnecting the vacuum hose to the bottom of it. Put the new air-filter in and replace the top. Replace the rear bonnet (while the bonnet can be removed fairly easily by 2 people, I would suggest having 3 on hand to replace it. Also, if you have a QV spoiler on the rear bonnet place some towels in between the roof and the spoiler when removing / reinstalling the bonnet to prevent accidental bumps).
RESTART:
The car is ready to be started up now. Reconnect the battery cables. Start the car. It will run a little rough for the first minute or two until the air is purged from the fuel lines. If you are changing your oil, now would be a good time to do it (after the car warms up). Congratulations, you just did your 15K service!